Saturday, July 28, 2012

Zucchini made YUMMY!


So a couple of weeks ago, I had some family stop by before leaving town and they were kind enough to bring me some fresh veggies given to them (they didn't want them to go bad when they left town, which I totally get).  Very nice of them.

One problem...

I rarely eat zucchini, and they brought me this:

A GIANT ZUCCHINI!!!!  I put it on a oven mitt to give perspective (ignore the blueberry on the thumb, that's from muffins earlier that morning that I will post about later).

It reminded me of why this add probably exists.
Image: www.nbcdfw.com
Yes, this is a real billboard here in Dallas.  And yes, I think it is hilarious.


So, What to cook with it....

And of course, thank you Pinterest for the wonderful suggestion of Oven Baked Zucchini Fries from Gina at skinnytaste.com!

Since I'm allergic to eggs, yeast, and most other normal things, I made a couple substitutions from her recipe, so below is what I used.

Oven Baked Zucchini Fries 

Ingredients:

  • 1 MONSTER Zucchini (or 2 small)
  • ~2 T. Soy Milk (I used melted coconut spread as a butter replacement but I think soy milk would help with crisping)
  • ~6 Wheat Thins Flatbread crackers
  • 2 tsp grated Romano cheese
  • Cooking spray
  • 1/2 tsp garlic powder
  • Salt
  • Black pepper
Crush the crackers into crumbs, I throw it into my Magic Bullet blender but a food processor would work great too.
Put the crumbs, Parmesan cheese, salt, pepper and garlic powder into a ziploc bag and mix together.
Line a cookie sheet with foil and spray lightly with cooking spray.

Dip the zucchini sticks into soy milk (or egg white as Gina suggested) then put into the crumb/cheese bag. Shake to coat.  Spread the fries out on the cookie sheet and lightly spray again with cooking spray. 

This wasn't all of the Zucchini but I thought it was enough for 2 people...I was wrong, I should've made more since these were so good.

Bake at 425° for 20-25 minutes, or until golden brown, flipping them over after ~15 min.


I served them with Spaghetti Sauce (didn't have any marinara on hand) and Ranch of course.  Mine weren't super crispy since I used the coconut spread instead of soy milk but were still delicious!  My boyfriend actually ate most of them since he liked them so much!

So that used most of the Zucchini, but with what I had left over still, I made this Cheesy Zucchini Rice tonight:
Cheesy Zucchini Rice from Buns in My Oven

It was GREAT!  Definitely a great way to get vegetables into dinner.

Just 2 more ways to use Zucchini and STOP vegetable abuse!  :-)


Thursday, July 12, 2012

Yay! for Homemade Moisturizing Lotion

So I've been talking about making this lotion and now that I have, I LOVE IT!
 
As posted before, here is the link to OneGoodThingbyJillee and her lotion post.  In the post, she mentioned a couple different recipes so I combined them to make my lotion.


Keep in mind, this is lotion.  It's not Grandma's Super Secret Italian spagehtti sauce spice mix with precise amounts of basil, oregano, and rosemary. 
It's lotion.  So I'm all about eye-balling and estimating.
I also used a higher ratio of vitamin E cream since I really liked a thicker lotion, but it's all about personal preference so use more of what you like the most.

So let's get on with it....

Homemade Lotion Mix:
~8 oz. Baby Lotion (Dollar Tree $1 for 15 oz.)
~4-6 oz. Vitamin E Cream (Dollar General $1 for 8oz.)
~1/4 cup Creamy Vitamin E Petroleum Jelly (Dollar Tree $1 for 7oz.)
~2 Tbsp. Coconut Oil (Sprouts $10 for 16 oz.)

 And the petroleum jelly I found really was "creamy".  More like a cream and less like jelly at all. (which I preferred anyway)

Also, because this is Texas and since my coconut oil apparently "melts" at >76 degrees, unless I kept it in the fridge, it was always liquid.  So instead of solidifying it, then having it make my lotion weird later on, I just left it in liquid form and used much less of it.
 Just throw it all in a bowl together


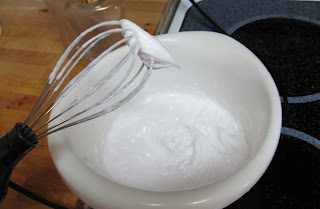
To mix, I used a stick blender with a whisk attachment and mixed ~30 sec to 1 min, until I got "stiff peaks" like whipping up egg whites or frosting.
By the way, this little gadget I picked up a while back for $20 shipped from a "daily deals site" since I wanted a stick blender and a food processor.  So far, definitely worth the money since I only use it once a week or so.


So now that it was all mixed up and awesome I ran into a ...small....um....dilemma....
How do I get this nice, thick lotion, into that little bottle opening without making a complete mess and wasting it all.....
...........................HMMmmmmm................ ::insert Jeopardy timer music::   ..............................
Well, I whipped my lotion to "stiff peaks" like a frosting right?  So why not bag it like a frosting....Uh....DUH!
 
 So I plopped it into a sandwich bag, cleaning off the spatula each time with my fingers on the outside and it worked GREAT!

 Cut off the tip of the bag and SQUEEZE into the bottle.

  TA-DA!!! Perfect! No mess and very little waste.  Look MOM, clean hands :-)


I used an old lotion bottle (10 oz.) and the vitamin E cream container (8 oz.) it filled up both.  Keep in mind if you have kids or plan to share with others, I would make more.  I just wanted to try out the ratios the first time to see how it worked out so I made a small batch.

And by the way, it smells wonderful as is!  Very light, fresh and soft.  I thought about adding lavender oil but after mixing, it was way too perfect and I didn't want to change it one bit.

Ever since making this, I only use my other stuff when at work or I can't find these.  It's awesome.  Fresh, light, non-greasy, and best of all CHEAP!

If you have made this and have questions, comments, concern, issues, or suggestions, please feel free to post a comment.  I would love to hear how other people make adjustments based on their liking.

Monday, June 25, 2012

Who says Goodwill only has junk?!

So while out looking for some vitamin E cream to make the lotion I mentioned...

I decided to stop at Goodwill.  My boyfriend hates it when I do things like that but he was at home so I figured, oh what the heck!

And to my surprise, I found this AWESOME little guy!


He was only 99cents!  I mean seriously, how cute.

However, he did have a couple small ouchies.  So using some nail polish, I touched him right up.


Touched Up

So now, instead of my stove utensils sitting in this guy:

Ikea holder: functional, but I need more color

 They can hang out in this!
 

New guy!
 How FUN is HE?  Sorry, I love colors but am always too afraid to paint bright colors on the walls so a little pop like this guy makes me WAY happier than it should.

Oh and yes, I have a TON of spices :-)  These are the ones I used most often and keep on the counter.  The rest (two cabinets full) are stashed out of view.  Next time I'll try to be better with my "product placement" by making sure all of the labels are facing outward and such...  I'm still learning....

Anyway, YAY Goodwill, 99cents, and nail polish!

Have you had awesome finds like this?  Please post a comment; I'd love to hear about it!

Sunday, June 24, 2012

Chicken, and Biscuits, and Fries, Oh MY!


So I've spent all of this time pinning recipes on Pinterest and finally decided,
"You know, I am actually going to MAKE one of these instead of just Droooooling over them!"

So tonight for dinner I made:

picture and recipe from jamiecooksitup.blogspot.com


As well as:

picture and recipe from playwithsugar.blogspot.com
And these also:

picture and recipe from Plainchicken.com

AND OMG YA'LL IT ALL WAS AMAZING!!!!!!!!

The chicken was moist, fries flavorful, and biscuits soft and buttery!  My boyfriend loved it!  He was so excited, now he had some tasty leftovers to take to work this week.

So now, that I'm starting to get this blogging thing down, I just need to remember to TAKE PICTURES of what I make!  I was so excited that it turned out so well and was so tasty, I forgot that whole picture process of Blogging 101.
Oh well, at least you have the pictures of from the original posters which I'm sure would be much better than mine anyway...

I encourage ya'll to make any or all of the recipes above.  The leftover biscuits will be great for breakfast with bacon.

Now it's time to go make another Pinterest DIY find.... semi- Homemade LOTION!
Homemade Moisturizing Lotion from Onegoodthingbyjillee.com

I'll definitely remember to take picture of this one!


Wednesday, May 23, 2012

Let's just put the Salt on the table!

After years of being an internet junky, reading forums, blogs, and most recently, being addicted to Pinterest, I've FINALLY decided to start my own blog!  Yay for me!  Alright, that's over, let's move on.

As you can tell I'm running with the spice (or seasoning to be correct about some references) theme to get started.  Just a warning, I'm layin' it on thick & tangy (::pun drum noise::), get used to it...just wanted to make sure it sticks...

So as the title implies, I'm going to stop just using the salt in the kitchen and put it on the table for everyone to see and use!


My spicy tricks, tart tips, and sweet recipes are out for everyone to taste and share!

You'll see random recipes, DIY everything, nerdy jokes, and everything in between.  They are the flavors of my life and home!

Welcome and have fun!